Showing posts with label The Beginning. Show all posts

Mar 2, 2015

Real Life "Love It or List It"

I can't believe I posted only once last week.  I'm so glad you all like my choices for the kid's bathroom. The tile came in this week so once a few other projects are finished up, we will get started on the bathroom.  I will keep you posted.

Who watches "Love It or List It"?  I really like that show.  I watch it often while I'm running on the treadmill at the YMCA.  Like most home decor shows, it's a fairly predictable script.  Couple hates their house the way it is, one partner wants to update the existing house, the other wants to move all together.  They give X amount of dollars to update and X amount of dollars for a new house.  A designer takes X amount of dollars and does all she can to make their existing home what they want and a realtor takes X amount of dollars to find them an already existing dream home.  Of course the designer always seems to hit some problem which prevents the couple from getting everything on their wish list and the realtor shows them a few cruddy houses before finding the "perfect one".  In the end they have to decided if they love the renovations to their existing home or if they want to sell and buy the dream home.  

Well, we are not renovating this house to sell, but it does seem like we uncover more problems as we go along.   And with more problems, means more money.  Luckily, while this week uncovered some new problems we also discovered better outcomes then we expected on previous problems.  

To kick off the week, let's play a game, shall we?  In the picture below, tell me what just doesn't look right to you.


Did you catch it?  Does anyone else see the problem with cutting your floor joist to put your plumbing?  AAAAHHH!!  I really don't understand people sometimes.  And I really don't understand/can't believe the home inspector didn't catch this.  

The pipe through the floor joist was just half the problem.  In addition to having to do something to sure up the floor joist, the toilet that's hooked to this plumbing had had a leak and it lasted long enough to compromise the plywood subfloor causing the toilet to never be able to screw in and hold tight to the subfloor anymore.  Therefore, we would always be dealing with a leaky toilet.  Well a leaky toilet is no good, so a fix required my contractor to have to ripe out the subfloor which unfortunately had a wall over it so that had to come out too, and then rebuild everything.  Ca$$ing, Caching, Ca$$ing!!!  But we all remember the importance of "underwear" right?  It had to be fixed.  Here are the pictures of that process, as well as a peak into the walk in pantry which is part of another project I will blog about soon.


Bathroom before the demo.  You can see the pocket door to the left 
which was in the wall that had to be taken out and rebuilt.

The beginning of demoing out that wall.


Subfloor, wall, and bathroom demoed out.


A view down into the basement below the guest bathroom.
You can see where he reinforced the floor joist.


Another look at the plumbing through the floor joist.


This was the bad news of last week.  Fortunately we got some good news which saved us money.  That is for tomorrow.  Have a great Monday everyone!

Feb 23, 2015

Going For It

Happy Monday!!  Our weekend was crazy, so I'm actually glad to get to a routine this week.  I hope you are all staying warm wherever you maybe.  I'm so excited to be sharing the kid's bathroom tile choices with you today.  It is a space I will be very excited to see once it's all put together.  

I think one of the biggest hang ups many of us face when decorating is the fear of making a mistake.  Home imporvement projects are not always cheap and when you are installing or replacing something there are many things you need to consider.  However, from personal experience I have come to realize that we often settle for something we may not like as much as something else all in the name of resale, or what the latest decor trend is, or what the "experts" tell you should or shouldn't do, and often what our mother says we should or shouldn't do (don't get me wrong, mother's have great advice, but sometimes they may not quite get your style).

Why do we do that?  Why don't we just get what we like the most and be ok with it?  I think it stems back to our days of schooling and thinking that if we don't pick the right thing, we fail.  Guess what?  Is there really a "right thing" in decorating?  I don't think so.  The "right thing" is different for everyone.  Obviously there are rules of color and decor which will help, but they don't always apply and can be tweaked to individuals and individual styles.  That's what makes decor so amazing.

Many things in this house were in an incomplete state when we bought it and that was more by my design then the choice of the seller.  We opted to have him not complete them so that we could finish them the way we wanted.  The kids bathroom is a good example of this.


 Sorry this photo is blurry.  
But it's a good look at the whole bathroom.


Here is one of the shower, 
which is where the work really needs to be done.

Since the bathroom is currently in a condition which makes is unusable, it is a top priority before we move in.  I was planning on using the existing flooring and finding something I liked to match it for going in the shower, but the truth is, I really don't like the floor tile.  It has too much orange.  I feel badly since the seller worked really hard on it and actually did a great job but it's going to get ripped out.  


Also, it's not a huge space so the cost is relatively low to replace it.  If it had been in a larger space,  I would have made it work somehow.

So off to the Tile Shop I went a few weeks ago to start looking for exactly what I wanted.  There are so many choices, that it can get overwhelming.  Since it is the kid's bathroom, I knew I wanted something whimsical but still classy, childlike but still mature.  It's a fine balance to get all that.  

I decided on the surround tile for the shower pretty quickly.  I had found a smaller similar tile at Lowe's, which I may still use once I see how the larger tile looks.  It's a white porcelain with a wave in it.  It gives movement to what would be just a plain white tile and has a water feel to it.  For an accent boarder I decided on a glass circle tile in greens, blues, and grays.  It reminds me of bubbles and fun but it doesn't look too kidish.  When in came time to pick  the floor I went back and forth and finally decided to really go out on a limb and chose a smooth stone/pebble floor.  Because nothing else really says whimsy and fun like a stone/pebble floor.  Here they are all together:


MANY people (namely my mother and husband) have raised concern about the floor being comfortable to walk on and easy to clean.  I can say it is comfortable to walk on.  I took my shoes and socks off right there in the store to check.  As for cleaning, I guess we will see.  I'm not too worried about it.  

The important thing is that when I look at all of them together they just make my heart happy.  And let me tell you friends, I have learned from experience that if a decor choice makes my heart happy, I'm going to like the final result.  I can't wait to see it all together in my space.  It will be a small space of extra happiness in a house full of happiness.  It really can't get much better.

Feb 12, 2015

It's All About The Base

Happy Thursday everyone!!!  We have plummeted back into a deep freeze after enjoying almost 60 degree weather this past weekend.  It's given me a good excuse to hunker down at home and stay warm.  Good thing too since the cold/flu bug finally bit me.  I could feel it coming on yesterday so I pushed through trying to get as much done as I could.  Who else does that?  Unfortunately we mothers don't really ever get a sick day.

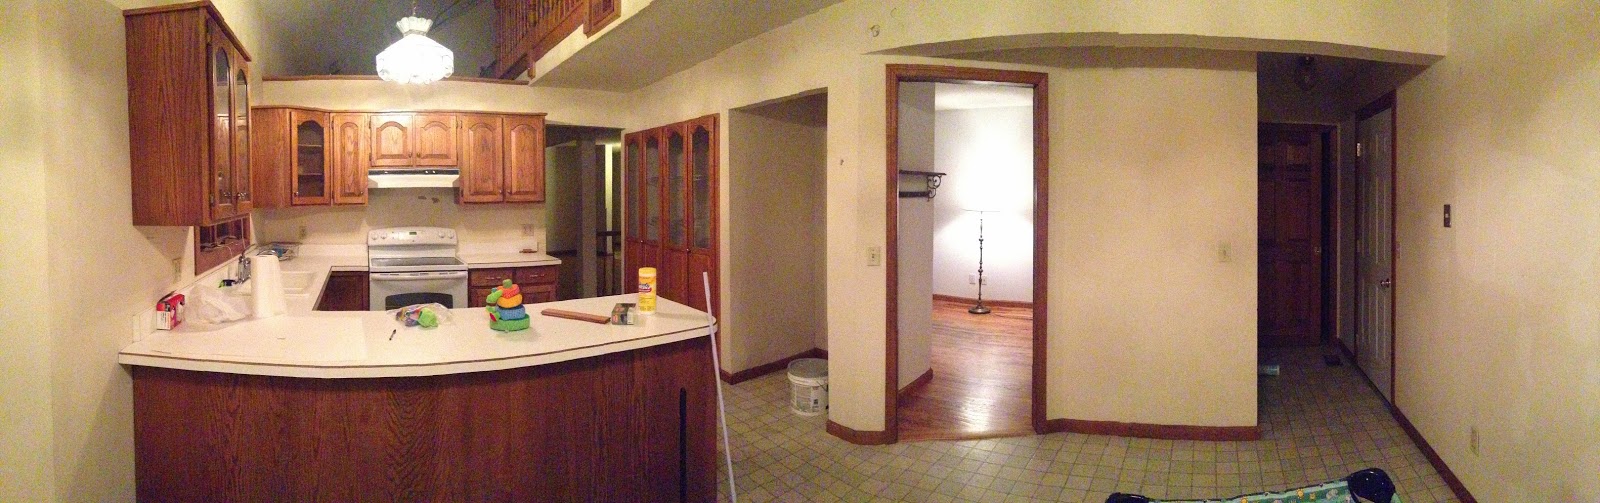
Enough about me, let's move onto the house.  Today we find ourselves back in the kitchen.  I am going to have to tackle a huge project soon in there and I'm hoping to get some good feedback from everyone reading this.

If you will remember, the cabinets are a lovely oak variety and are original to the house so they have a fair amount of wear and tear on them.

Lovely Oak!!

Visible wear on the doors.

Some doors even have cracks in them.

And, they're just really dirty.

I have researched a bit on what exactly I should place on these to make sure I get the most use out of them.  I will definitely be using an oil base primer.  The kitchen is so high traffic that I don't have a choice.  In our current home which also had oak colored cabinets when we moved in, my mom helped me paint those with an oil base primer and latex paint and they have held up splendidly for 8 years.  I painted them white which I've loved and I've never had a problem with the stain color bleeding through.

In my research for this house, I've come across a product called "Brushing Putty" sold by a company called "Fine Paints of Europe".  It is a super thick primer that covers wood grain and allows for a smother finished product.  It does require sanding (frowny face), but it does seem to get some good results.  It is also not cheap.  The largest size they have which is a little less than a gallon sells for $125.  But, that is still WAY cheaper than new cabinets so I'm willing to give it a go.

What have been some of your favorite paint products to use on stained wood and painting in general?  I'd love your feedback.  I'll let you know my final decision soon and will hopefully have progress pictures to show you.

Have a great day!  And keep warm!

Feb 10, 2015

Kitchen Update

I hope you all had a fantastic weekend.  Mine ended up being more crazy then initially planned (thus why this is going out on Tuesday instead of Monday).  Kidlet #1 coming down with the stomach flu.  Nice!  I'm bracing myself for when the others (and possibly myself - Blah) follow her lead.  I shouldn't complain, this is the first real bad sickness this year - knock on wood!  Wish us luck!

Today I'm going to give you a little update on the kitchen.  I have gone through about 30 different scenarios regarding what to do with this space and I'm really excited about what we finally are doing.

In the first few weeks after buying the house I had a lot of people come through to give me bids on various jobs.  Everyone had an opinion on what I should do.  Even though it was like drinking from a fire hose, it was really good because I got a ton of ideas.  Some unfortunately just didn't end up being feasible at the present time.  They would have taken a lot more money and time then I could afford to spend right now.  The big idea that many wanted me to do was to knock down the wall holding the pantry and refrigerator.


 By knocking down this wall, I would have opened the room up to a study that is currently behind this space.

The doorway to the right of the refrigerator space is the one that leads to the study.

Close up of the door.


Inside the study.

It would have been a nice space to have.  It would have made the whole room seem so much bigger.  I was planning on make it into a sitting area where my kids could play and watch TV while I made dinner and cooked in the kitchen.  By opening the wall up I would have had to find a place for the fridge.  The only realistic space would have been to the left of the sink which would have required me to remove my peninsula and turn it to make an island.
Can you picture it?

I know it would have worked and it would have been fun.  I was ready to do it until we realized that the beam supporting the loft that is above didn't run the entire span of the kitchen, meaning the walls of the pantry and refrigerator were supporting.  I could have had a structural engineer come in, things moved to have made it work, but it just would have been too much.  At the height of all of this, I had a guy in who has done several kitchen remodels and flips and he said that a kitchen remodel of this extent was a "want" and not a "need".  Since this house has a lot of "needs" he advised me to hold off until I could just focus on the kitchen.  It was great advice and I listened to him.  

However, by not knocking out the wall I was able to do a project I had intended on all along.  I did end up deciding to take down the pantry doors and push back the back side of the pantry about 20 inches to create what I'm calling a "Baking Center".  I'm so excited!!!

I'm able to do this because in the study is a closet space just on the other side of the pantry.  We started work on it this week and her is the progress so far.

The view from the kitchen side with the wall knocked out looking into the study.

The view from the study looking into the kitchen.

Unfortunately there was venting in the wall, but it was fairly easy to move back with the wall.

The new wall up and ready to have the venting moved.

New wall in with sheet rock from kitchen side.

New wall in with sheet rock on study side.

I'm so excited for this space and have some great ideas in my head on what it's going to look like.  Hopefully they come together.

Are you wondering what I'm going to do with the study?  Well I lost my little pantry by doing this so the study is now going to be my HUGE walk-in pantry!!  It's going to be awesome.  My husband first thought the space was too big for a pantry.  But I don't think you can ever have too big of a pantry.  Am I right ladies?

There you have one of many of my ideas for this space.  I can't wait to show you more.  Have a great day friends.  Go chase your dreams.  It can be amazing!!

Feb 6, 2015

Transitioning

Things are starting to really pick up!!!  We have demolition in the kitchen which I will do a post about for Monday.  I honestly think this is the busiest I've ever been in my life and while it's a titch stressful, I'm loving it.  While I have to think ahead, I try and not get too ahead of myself.  It helps contain the stress.

One thing to help contain the stress is to plan as much as possible and hope that it will eliminate stress down the road.  Getting one house ready to live in and one house ready to sell is huge and organization/planning is necessary for it to go as smoothly as possible.  There is a lot that is going to have to take place between our current home and the new home and my husband and I are going to have to divide and conquer.  We have a scheduled dinner date this evening to discuss the action plan.

One thing I've decided to do to make the actual transition between the two homes a bit easier is to go through my current home and designate where everything I currently have, is going to go in the new home.  I started an excel spread sheet on it last night.  Here is what it looks like:


Many things will be going to the equivalent  rooms between the houses, but many will not and in order to reduce the confusion I am hoping this will prove to be very useful.  I also hope it will help me get rid of what I don't want/need well before the move.  We'll see how useful it all is in a few months.

I hope you all have a fabulous weekend!!  Ours is packed.  At least on Sunday we will slow down.  I love that day of rest built in.  It truly does rejuvenate the soul.

Go HERE for a great talk.  He even has a great story about finding the perfect house for his family.  How I miss BYU devotionals once a week, but I'm so glad I still get to hear them through the amazing gift of technology.  


Feb 3, 2015

Underwear


“It’s way more fun to buy a 
necklace than it is to buy underwear.”
-Greg Tilton

I love to make places beautiful.  I love being in beautiful spaces and I have quite the vision for this house and what I want it to eventually be.  Unfortunately, I’m a long ways off from being able to do everything I want in terms of décor because this house needs a lot of what I’m going to call “underwear”. 

I think we all would agree that picking out a new area rug or furniture piece is much more exciting than spending the same amount of money on paying to have your chimney swept or your house mitigated for radon.  But the chimney needs to be swept and the radon needs to be mitigated because in the long run no area rug can make up for your house burning down or your family member developing lung cancer.

While I have done a lot of work trying to estimate costs to the best of my ability there are always those costs that will sneak out from behind a corner and getcha.  I had one said cost present itself today.

Radon mitigation can be fairly straight forward.  Dig a hole, put in a fan, vent to the outside, done.  But of course, our radon mitigation is not quite so straight forward.  When digging your hole in the slab, ideally you have rock under your slab.  Less then ideally, you have dirt.  I’ll let you guess what we have. 

Since we are planning on putting a bedroom in the basement, properly venting the radon is important to us and when you have dirt, it makes it more difficult to do that.  A way to help that is by installing French drains.  A French drain is basically a trench dug out all around the inside of your basement slab which then has rock poured into it, then a pipe, then more rock, and eventually concrete repoured over the top (if I understand correctly from what the guy was telling me).  It’s not cheap.  It’s expensive "underwear".  

So with each new piece of necessary "underwear" a "necklace" gets crossed off the list.  But we all know that if you’re not comfortable on the lowest layer, it won’t matter how cute your necklace is because all you’re going to be thinking about is how uncomfortable you are.  And we also all know, necklaces come and go in the fashion world, or in this case the home decor world, so I know there will always be one I will love.  I just might have to wait a little longer.  But at least I’ll be comfy while I wait.


{Digging the Hole}


{Venting to the outside}

{This is incomplete.  The guy wasn't done when I left,
 so I will add on more pictures once I get them}

Jan 28, 2015

The Reveal - Front Room


I loved reading all your comments on the kitchen.  I love how it reminds many of you of the kitchen you grew up in.  When I'm done with it I'm hoping it will look nothing like it does now but still enough for you to see the kitchen that's always been there.  

OK, let's move along on the tour shall we?

As you walk out of the kitchen into the great room, the stairs to the basement are immediately to your right.


Can we just say, "Bring on the SHAG?!?!?"  It is actually pretty nice carpet and has an awesome pad.  It's just so...shag and blue!  It's got.to.go.


If you turn to your left, you will see these doors which lead to the giant deck in the back.


As you step back in the room towards the front door, you will see the fireplace and larger window to the right that looks out on the deck.


From the position of looking at the fireplace, if you turn to your left you will see the railing for the stairs leading to the basement and the stairs that lead to the 2nd story lofts.  Notice a pattern here?  Once again we have no banister.  The seller was working on that but I told him to not put it in so that I could do what I wanted.


If you turn around in the room, you then look at the front door.  It has no trim and a piece of broken glass.  Hopefully all quick fixes.


From the front door, if you look to the left, you will see the hall leading to the hall bathroom and bedrooms.  And YES, the bathroom is not finished.


Well, that's it for today.  I hope you enjoyed it.  We will do a tour of the end of the hall and lofts soon.  Then onto the creepy basement.

I am also wrapping up my "interviews" of contractors getting bids on all the jobs that need to be done.  I had a bit of a panic earlier in the week but it's looking to work itself out and hopefully even better then I originally thought.  I've gotten a ton of good advice and am ready to start to see things happening!!!  I can't wait!


Jan 26, 2015

General Contracting 101

Happy Monday!  I hope you all had a great weekend.

It should be obvious to you all by this point, that the house needs quite a bit of work.  With 4 small children, a full time job on my husband's end, and life in general, our spare time is very limited.  We had a mutual understanding in buying this house that a LARGE (if not all) portion of the immediate work that needs to be done would be contracted out.

Enter Me.  The new general contractor.  Of sorts.

Since we know we are going to be spending a bit more money by paying someone, I have been meeting with tons of contractors over the last week and a half to get bids and hopefully get the best price for the best job.  This process has it's pros and cons.

On the pro side, I have learned a ton and gotten a lot of useful tips and feedback from everyone who has come through the house.  Everyone has an opinion on what you should do - and that's good and bad.  It's good from the standpoint that almost every scenario is addressed but bad because it becomes a bit overwhelming.

On the con side, it takes a lot of time.  We are a bit pressed for time on when we would like to move into the house so I feel a little heat on my heels.  It takes a lot of time to go through what you'd like each individual to do and then it takes time for them to get you a bid.  A few have given me bids on the spot which has been wonderful because it at least gives me a starting point.

I know a large part of this process is going to force me to be a good juggler and I'm up for it.  I need to remind myself of that every once in awhile.  I know I'll make mistakes, but that's ok.  That's life.

To help make my life a bit easier, I have what I like to call, "The Command Center".  Or if you don't want to be so for boding, "the command bag".


Here is a picture of what I have inside (contents may vary from day to day, but this is a general overview).


Let me explain everything for you:

1.  The folded up white papers with blue trim are the blue prints of the house.  We were super lucky and got them from the seller.  They have been invaluable. 

2.  The HGTV magazine.  I get my inspiration from everywhere so I love to grab a good decor magazine and look through it for good ideas when I have some down time.

3.  My laptop.  I use this for budget planning, writing this blog, and many other things.

4.  To the right of the blueprints is a tape measure on top of two books.  The blue one is my calendar where I write all appointments for the house and our lives in general, and the brown book is where I have every contact number from plumbers to concrete layers.  I also write notes of things I need to do and bits of info I need to remember.  If I lose either of these books come looking for me at the local hospital because I will be heavily sedated from a panic attack.


5.  The purple striped binder holds receipts, bids, etc. that need to be organized and filed.

6.  Last, but not least, the granola bar.  I always carry something to get me through a long appointment or quiet one of my children.

Not pictured are a pen and my phone.  My phone (swoon).  I truly love it.  

This is all a process and I'm still enjoying it so that is good.  I can't wait to actually start to get things going.  I'm just as excited to start to see a transformation as all of you are.

Jan 20, 2015

Inside Reveal - Garage

"The doors we open and close each day decide the lives we live."
~Flora Whittemore


Thanks everyone for your more then kind and encouraging words yesterday.  It’s so nice to read such nice things from people, even though I’m well aware many of you are probably thinking I’m crazy.  Who isn’t crazy though?  Take a minute and honestly ask yourself that question.


Are you ready for the inside?  I will do my best to give you a good idea of what it’s like, but pictures can be tricky.  If you stick around long enough, I’m sure you’ll put things together.  There is a décor blog I have frequented for years and only just recently was I really able to understand the flow of her house.  A little mystery never hurt anything anyway.  

Since there is so much going on inside, I'm going to give you one room at a time over the next few days and possible weeks.  This first one isn't super exciting but it is a great feature of the house. 

THE GARAGE

One thing that is awesome about this house is the garage.  It is HUGE!!  It’s 3 car but an Extra Large 3 car garage.  We aren’t going to know what to do with all the space but I have no doubt we will fill it in no time.

Let’s go in, shall we? 


This picture is taken looking at the double side of the garage.  In the back corner is a door out to the back yard.  To the right are the stairs leading to the main floor of the house.


 Here is looking to the right side of the garage where the single car is.  That carpet is from the basement.  I couldn't wait to tear it out.


Here are the stairs leading up to the house.  fdgdDid you notice something’s missing?  Safety and code were not really on the sellers top priority list.   It is at the top of my list, so this will be fixed soon.  At first I was a sad that there is a set of stairs up to the house, but every house has something that is unchangeable, that you wish you could change.  Of unchangeable things, this is minor in my book.


Harry Potter worthy stairs.  At least in Harry Potter they had railings!

Let's move onto "Bonus" material.

The can shoot down to the trash for recycling.  Ingenious really.  My boys will love it - if I keep it.


 A random hole in the ceiling.

 The cover for the opening into the attic.  We are planning on putting in pull down stairs.  There's no way to get up there otherwise.

A good shelf for storage and gardening equipment thrown in!


The best  for last - THE CAN CRUSHER!!  My boys will definitely love this.

I've got to run.  Sorry it's not more, but I will get it to you, just be patient.  Doing something like this is all so foreign for me, but in a very good way.  My head hurts after talking with so many contractors all day.  I just pray I can keep them all straight and not cry.  Please bless that I won't cry.